Automate your Cisco CCIE Home Lab for the INE Workbook v5 – UPDATED 2018
Further to my last post some time ago about how to automate your INE lab config deployment I thought I’d share my updated method.
This tutorial is based on INE’s CCIE v5 lab topology using CSR routers;
I’ve further optimised my method to use telnet as I found configuring via the console was a little slow and unpredictable. So, a quick reminder – essentially what this script does, is to enumerate the configurations from the INE files, and uses expect scripting to apply it to your routers and switches.
The biggest change is that I now use interface Gig4 which doesn’t exist in the INE configurations and so their config’s won’t overwrite the interface when you merge them into your base configuration.
This is what your lab should look like at the end of this tutorial
Requirements
The same requirements stand as my previous post, you will need;
– An ESXi Server with minimum 32GB RAM
– Cisco CSR100v OVA from Cisco.com
– A Linux Server (I use CentOS 6.4 ISO)
– A set of 4x WS-C3560-24TS running 15.0(2)SE6 and some GLC-T’s
– A separate switch with at least 5 network ports (any old unmanaged switch will do)
ESXi Setup
First things first, we need to disable Large Pages on the ESXi Host. Disabling Large Pages will allow vmwares memory sharing (TPS) to kick in, and allow you to spin up 20 of the CSR routers without it gobbling up all your RAM!
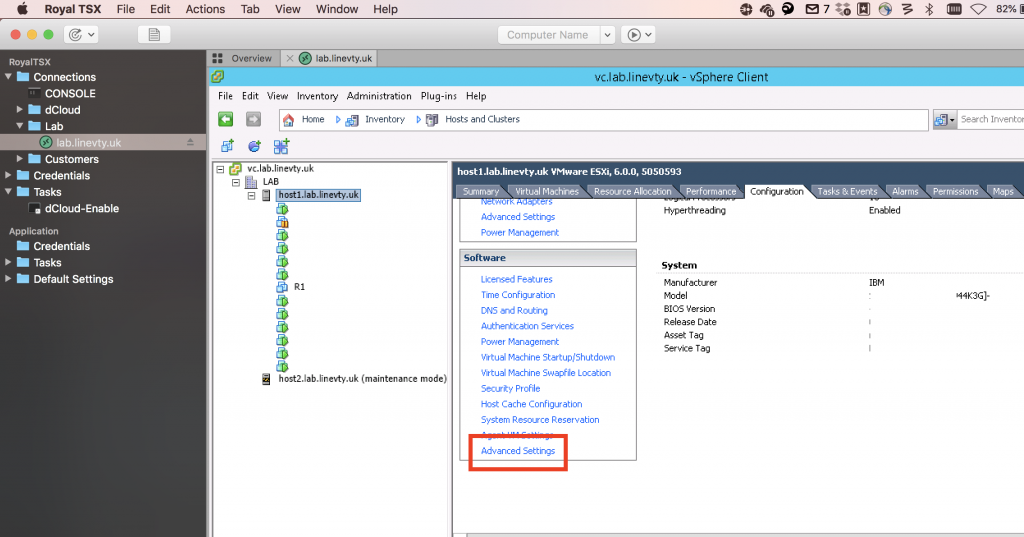
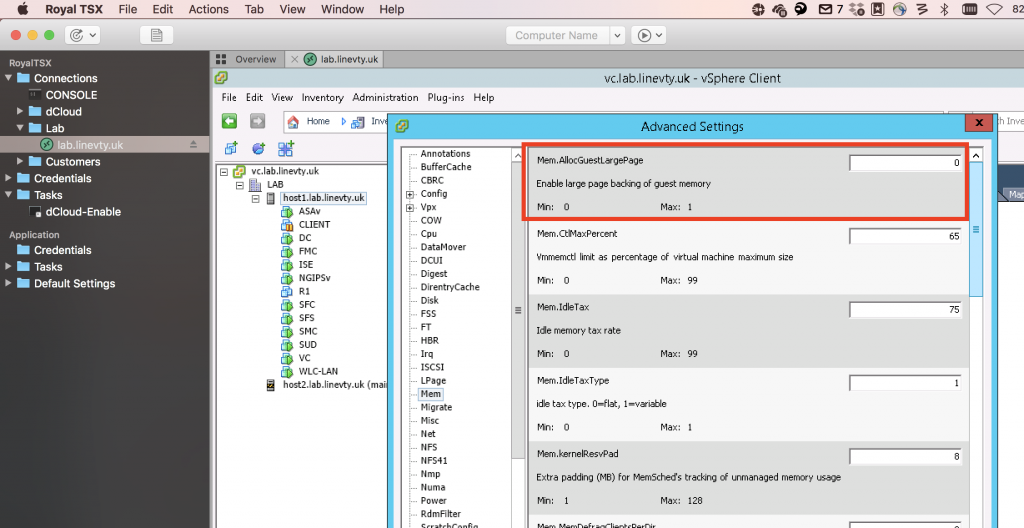
Reboot your host after changing this setting for good measure! Not sure if its actually required though.
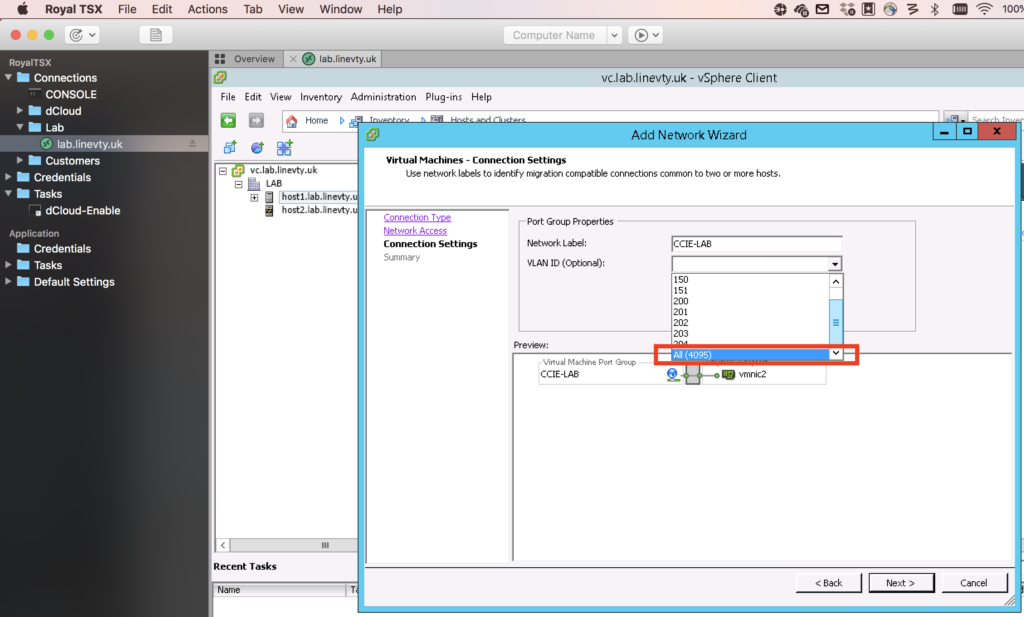
Next You need to create a new Virtual Network for all your routers.

Create a new ‘Virtual Machine’ Network, name It CCIE-LAB or some other relevant name, and make sure you set the VLAN ID to ‘ALL VLAN’s’
CSR Deployment
Now we need to deploy the CSR1000v, rather than re-invent the wheel there is a great article on how to do it here.
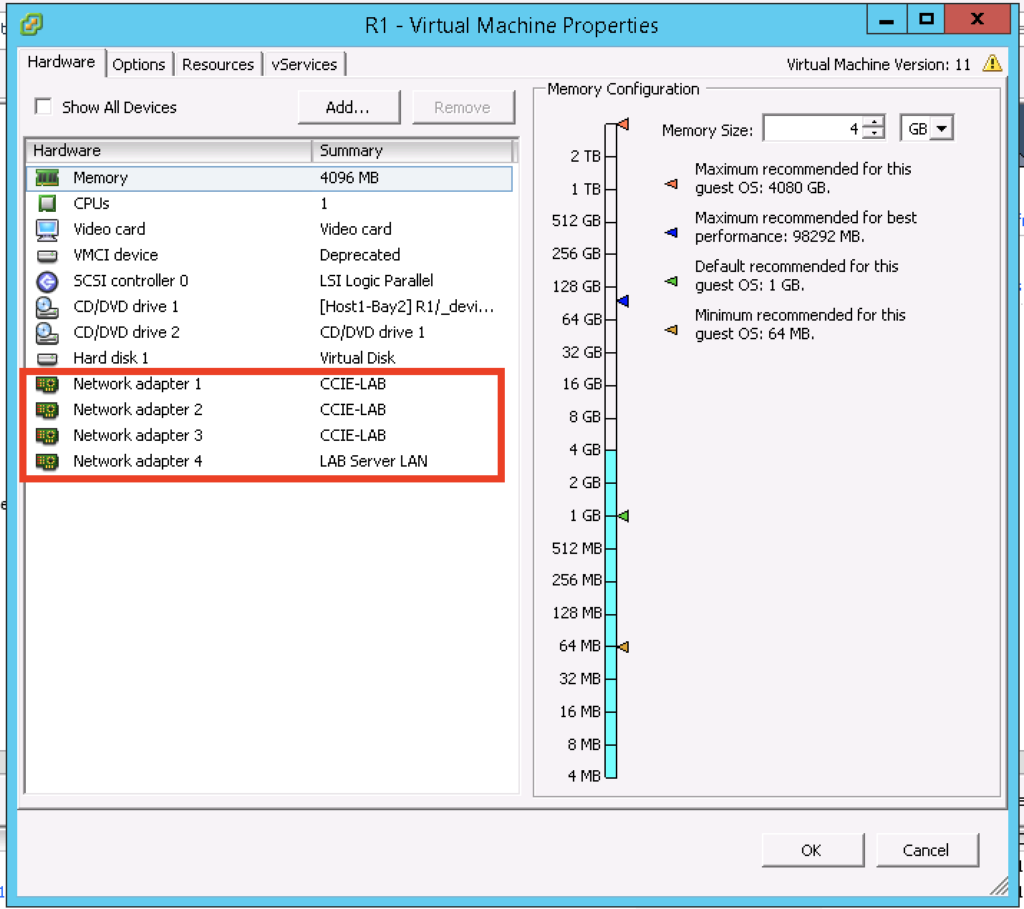
When following Rogers guide, after you’ve created the VM make sure to add an extra network card to EVERY CSR so that theres 4 in total and attach the first 3 to the new CCIE-LAB network, and add the additional 4th nic to your existing lab network (in my deployment this is on the same network as my ESXi Management and linux server). This is the interface we will use to telnet to the CSR’s and apply the configuration.
Once you have twenty of them deployed, power them on and test your console access. Using the telnet via the ESXi host method as described on Rogers blog will work best for the next step.
Switch connection
Next, you need to connect your switches up based on the INE topology drawing, but in addition you need to connect up each switches Gi0/1 port to your management switch. See the drawings at the top of this post for how they should be connected up.
Configure Base Config
So, now we need to apply a base config to the routers AND switches.
Download the base config pack for the initial console sessions from here console-configs.zip
Use the telnet method to access the CSR console’s and apply the base configuration (just copy and paste) to each of the CSR router’s, you’ll also need to use a console cable to program your 4 switches.
The base config include’s,
– Standard username/password
– VRF for management
– Gi4 interface IP details
– HTTP get source interface for copying the configs
Change the ip addressing and routes as required to match your own addressing/network if deviating from the addressing used here.
You can of course stop here at this point, and manually take the INE configurations and apply them to your routers and switches one at a time…. Yeah it is a pain, major effort to start even the simple labs.
Enter Automation…

As there are a lot of labs, and as you’ll likely have to deploy them multiple times during your study, automation can work for us here which will save you time setting up, therefore giving you more actual lab time!
Linux Server Setup
Install Linux as a VM, I use CentOS 6.4 and I’m not going to bore you with how to install it, theres plenty other guides online, just make sure during setup you select to make this server a WEBSERVER, and connect it to the same network that the Gi4 interface of the CSR’s are connected to.
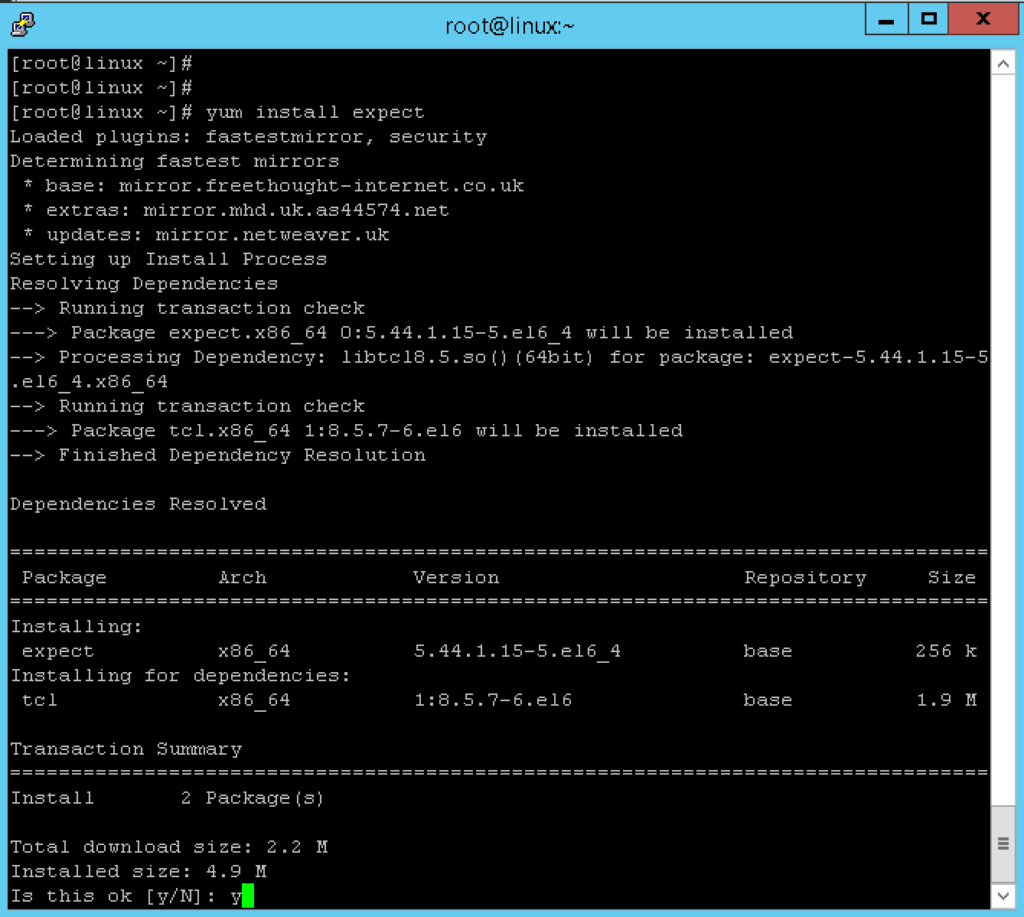
Next we need to SSH to your server (using root is fine) and we need to install telnet, yum, unzip, make sure the firewall is disabled, ensure httpd starts on boot and install expect
yum install telnet

yum install wget

yum install unzip

service iptables stop

chkconfig iptables off

service httpd start

chkconfig httpd on

yum install expect
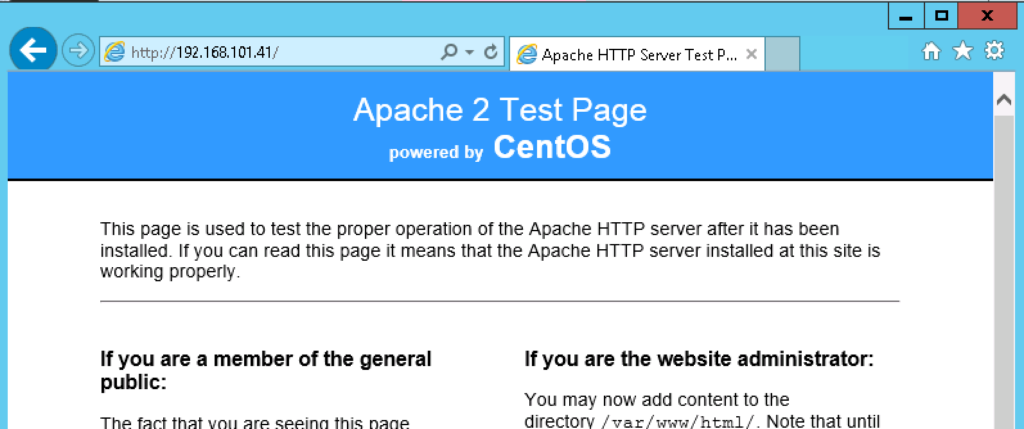
you should now be able to validate your web server is working by browsing to its ip http://192.168.101.41
LineVTY.com Scripts
Now your in a position to download and setup the scripts;
Download the lab scripts from here lab-latest Updated Oct2018 onto your Linux server
wget https://linevty.com/wp-content/uploads/2018/07/lab-latest.zip
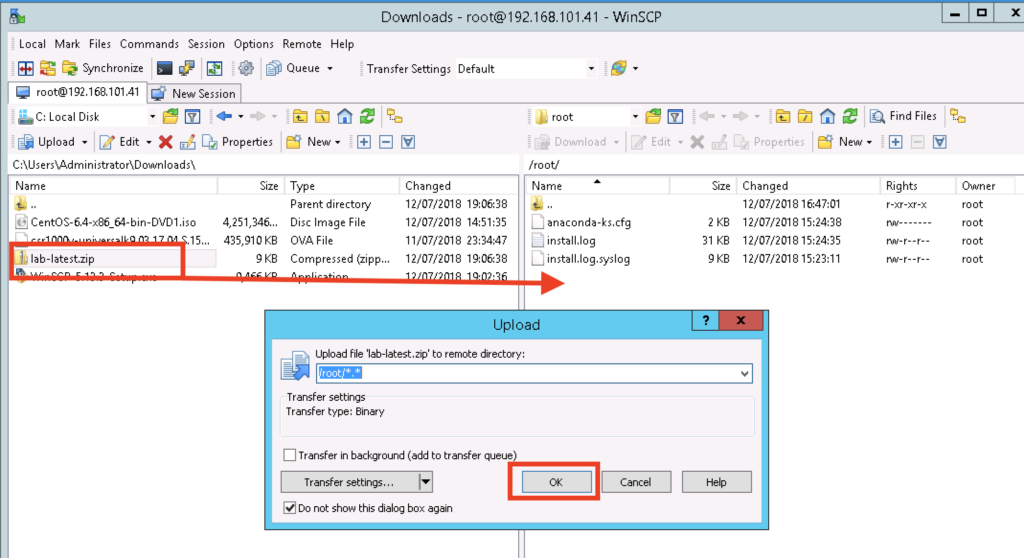
Alternatively, copy the zip file ‘lab-latest.zip’ to your linux box in your /root folder using something like winSCP;
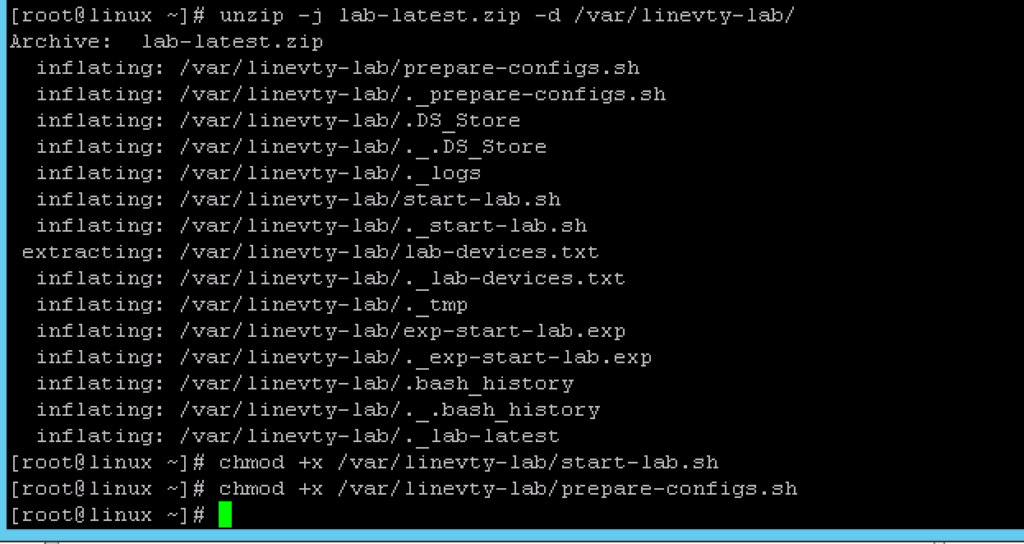
However you get the zip onto your linux server, the next step is to unpack the script into the correct directory, and set the permissions to execute;
mkdir /var/linevty-lab/

unzip -j lab-latest.zip -d /var/linevty-lab/

chmod +x /var/linevty-lab/start-lab.sh

chmod +x /var/linevty-lab/exp-start-lab.exp

chmod +x /var/linevty-lab/prepare-configs.sh
Next we need to load in the base configs and your INE pack.
Download the base config pack from here linevty-configs-v2 FIXED Oct2018 to your Linux server
wget https://linevty.com/wp-content/uploads/2018/07/linevty-configs-v2.zip
Alternatively download the zip to your PC and use WinSCP to copy the ‘linevty-configs.zip’ file below to your /root folder.
Now we have the zip on the Linux server, we need to extract its contents into the root of the web server folder
unzip -j linevty-configs.zip -d /var/www/html/
Next you need to download the INE config pack from their website, and place them in the /var/www/html/ine folder.
Now, as some of the INE configs are of differing file types, some are binary and whatnot, we need to sanitise them. Its a shame INE didn’t do this, but never mind, they are easy fixed with a small script I’ve included in the zip. This ensures the files are formatted correctly, and removes some unnecessary commands from the INE configs.
./var/linevty-lab/prepare-configs.sh
!! IMPORTANT !!
If you’ve made any changes to IP addressing etc, now is the time to change the scripts, use VI, or edit the scripts in WinSCP. The only script to update is the exp-start-lab.exp with the ip address’s of your devices and of your web server.
And were done!
We are now ready to start a lab,
SSH to your linux box, and run this command;
./var/linevty-lab/start-lab.sh
You will be asked what lab you want to run, and the script will then proceed to telnet to each device in turn, re-apply the base configuration from the web server, and then merge the selected INE configuration into the running config!
Grab a quick cuppa and when you get back you can simply telnet to each of your devices and begin your labs!
Any questions please feel free to ask and good luck with your studies!




Thanks Steve!!
Hi, I got two questions, one:
When I run the ./startup script i get this error after choosing lab:
1) /var/www/html/ine
2) /var/www/html/ine/advanced.technology.labs
3) /var/www/html/ine/advanced.technology.labs/mpls.ospf.sham.link
4) /var/www/html/ine/advanced.technology.labs/ibgp.synchronization
5) /var/www/html/ine/advanced.technology.labs/initial.multicast
6) /var/www/html/ine/advanced.technology.labs/mpls.vpn.performance.tuning
7) /var/www/html/ine/advanced.technology.labs/initial.dhcp.authorized.arp
8) /var/www/html/ine/advanced.technology.labs/ibgp.route.reflection
9) /var/www/html/ine/advanced.technology.labs/ripng.initial
10) /var/www/html/ine/advanced.technology.labs/basic.bgp.routing
11) /var/www/html/ine/advanced.technology.labs/catalyst.multicast
12) /var/www/html/ine/advanced.technology.labs/mpls.eigrp.site.of.origin
13) /var/www/html/ine/advanced.technology.labs/basic.eigrp.routing
14) /var/www/html/ine/advanced.technology.labs/initial.bgp
15) /var/www/html/ine/advanced.technology.labs/dhcp.information.option.initial
16) /var/www/html/ine/advanced.technology.labs/eigrpv6.initial
17) /var/www/html/ine/advanced.technology.labs/inter.domain.multicast
18) /var/www/html/ine/advanced.technology.labs/mpls.mp.bgp.vpnv4
19) /var/www/html/ine/advanced.technology.labs/large.scale.ibgp.route.reflection
20) /var/www/html/ine/advanced.technology.labs/mpls.mp.bgp.prefix.filtering
21) /var/www/html/ine/advanced.technology.labs/ospfv3.basic
22) /var/www/html/ine/advanced.technology.labs/mpls.pe.ce.routing.with.bgp
23) /var/www/html/ine/advanced.technology.labs/ospfv3.initial
24) /var/www/html/ine/advanced.technology.labs/mpls.pe.ce.routing.with.rip
25) /var/www/html/ine/advanced.technology.labs/authenticating.bgp.peerings
26) /var/www/html/ine/advanced.technology.labs/bgp.next.hop.processing.next.hop.self
27) /var/www/html/ine/advanced.technology.labs/eigrpv6.basic
28) /var/www/html/ine/advanced.technology.labs/mpls.pe.ce.routing.with.ospf
29) /var/www/html/ine/advanced.technology.labs/initial.ospf
30) /var/www/html/ine/advanced.technology.labs/initial.rip
31) /var/www/html/ine/advanced.technology.labs/bgp.remove.private.as
32) /var/www/html/ine/advanced.technology.labs/initial.dhcp.information.option
33) /var/www/html/ine/advanced.technology.labs/basic.rip.routing
34) /var/www/html/ine/advanced.technology.labs/mpls.pe.ce.routing.with.eigrp
35) /var/www/html/ine/advanced.technology.labs/object.tracking.initial
36) /var/www/html/ine/advanced.technology.labs/lan.switching.initial.vtp
37) /var/www/html/ine/advanced.technology.labs/basic.ip.addressing
38) /var/www/html/ine/advanced.technology.labs/ipv6.global.initial
39) /var/www/html/ine/advanced.technology.labs/ebgp.multihop
40) /var/www/html/ine/advanced.technology.labs/ebgp.with.r9.to.r10
41) /var/www/html/ine/advanced.technology.labs/qos.initial
42) /var/www/html/ine/advanced.technology.labs/bgp.confederation
43) /var/www/html/ine/advanced.technology.labs/basic.layer.2.switching
44) /var/www/html/ine/advanced.technology.labs/bgp.update.source
45) /var/www/html/ine/advanced.technology.labs/ipv6.nbma.initial
46) /var/www/html/ine/advanced.technology.labs/bgp.disable.connected.check
47) /var/www/html/ine/advanced.technology.labs/mpls.bgp.soo.attribute
48) /var/www/html/ine/advanced.technology.labs/basic.ospf.routing
49) /var/www/html/ine/advanced.technology.labs/ipv6.initial
50) /var/www/html/ine/advanced.technology.labs/initial.eigrp
51) /var/www/html/ine/advanced.technology.labs/bgp.redistribute.internal
52) /var/www/html/ine/advanced.technology.labs/bgp.next.hop.processing.manual.modification
53) /var/www/html/ine/advanced.technology.labs/inter.domain.multicast.msdp
54) /var/www/html/ine/advanced.technology.labs/system.management.initial
55) /var/www/html/ine/advanced.technology.labs/dhcp.ppp.initial
56) /var/www/html/ine/advanced.technology.labs/security.initial
57) /var/www/html/ine/advanced.technology.labs/basic.bgp.routing.with.aggregation
58) /var/www/html/ine/advanced.technology.labs/mpls.vrf.lite
59) /var/www/html/ine/advanced.technology.labs/bgp.full
60) /var/www/html/ine/advanced.technology.labs/mpls.ldp
61) /var/www/html/ine/advanced.technology.labs/ip.services.initial
62) /var/www/html/ine/advanced.technology.labs/ipsec.vpn
63) /var/www/html/ine/advanced.technology.labs/initial.bgp.base
64) /var/www/html/ine/advanced.technology.labs/bgp.over.gre
65) /var/www/html/ine/advanced.technology.labs/dmvpn
66) /var/www/html/ine/advanced.technology.labs/ipv6.multicast.initial
67) /var/www/html/ine/advanced.technology.labs/mpls.internet.access
68) /var/www/html/ine/advanced.technology.labs/ipv6.redistribution.initial
69) /var/www/html/ine/advanced.technology.labs/mpls.label.filtering
70) /var/www/html/ine/advanced.technology.labs/dhcp.advanced.initial
71) /var/www/html/ine/advanced.technology.labs/lan.switching.initial.spanning.tree
72) /var/www/html/ine/full-scale.labs
73) /var/www/html/ine/full-scale.labs/rsv5.full.scale.lab.2.initial.configs
74) /var/www/html/ine/full-scale.labs/rsv5.full.scale.lab.1.initial.configs
75) /var/www/html/ine/full-scale.labs/rsv5.full.scale.lab.3.initial.configs
76) /var/www/html/ine/advanced.troubleshooting.labs
77) /var/www/html/ine/advanced.troubleshooting.labs/troubleshooting.lab.3.broken.initial.configs
78) /var/www/html/ine/advanced.troubleshooting.labs/troubleshooting.lab.1.broken.initial.configs
79) /var/www/html/ine/advanced.troubleshooting.labs/troubleshooting.lab.1.working.initial.configs
80) /var/www/html/ine/advanced.troubleshooting.labs/troubleshooting.lab.3.working.initial.configs
81) /var/www/html/ine/advanced.troubleshooting.labs/troubleshooting.lab.2.broken.initial.configs
82) /var/www/html/ine/advanced.troubleshooting.labs/troubleshooting.lab.2.working.initial.configs
83) /var/www/html/ine/mock.labs
84) /var/www/html/ine/mock.labs/rsv5.mock.lab.1.configuration.initial.configs
85) /var/www/html/ine/mock.labs/rsv5.mock.lab.1.troubleshooting.initial.configs
86) /var/www/html/ine/mock.labs/rsv5.mock.lab.2.configuration.initial.configs
87) /var/www/html/ine/mock.labs/rsv5.mock.lab.2.troubleshooting.initial.configs
88) /var/www/html/ine/advanced.foundation.labs
89) /var/www/html/ine/advanced.foundation.labs/foundation.lab.2.initial.configs
90) /var/www/html/ine/advanced.foundation.labs/foundation.lab.3.initial.configs
91) /var/www/html/ine/advanced.foundation.labs/foundation.lab.1.initial.configs
92) Quit
Please select a lab: 37
LAB 37 slected
Your starting lab 37 which is lab ine/advanced.technology.labs/basic.ip.addressing
“: no such file or directory
“: no such file or directory
“: no such file or directory
“: no such file or directory
“: no such file or directory
“: no such file or directory
“: no such file or directory
“: no such file or directory
“: no such file or directory
“: no such file or directory
The second question, how can I get the linevty default config back in via the script if i need to?
Hi Tom, if you navigate to /var/www/html/ine/advanced.technology.labs/basic.ip.addressing – does it contain all the r1.txt r2.txt files?
Yes, it does. I also run the prepare script also.
Hi Tom, I’ll drop you an email and see if I can get to the bottom of the issue!
Having another look at your question – in your selection list there should be a ‘base’ and then a reset directory – I think this may be whats causing your issue.
My config pack is wrong, its missing the ‘reset’ directory. I’ll re-upload it tonight, but if you simply create a reset folder and move the r1.txt r2.txt etc into it – the lab should work. Commands here should work;
mkdir /var/www/html/base/reset
mv /var/www/html/base/*.txt /var/www/html/base/reset/
The script essentially wipes/resets the lab before you start and so ALWAYS re-applies the base first (with ‘config replace’), before then applying the INE config over the top of it (with just a copy/merge).
To answer point 2 specifically, when you have the base/reset folder showing in that list, you simply select that one and, it will wipe the lab.
Hope this helps, let me know if you have any other questions.
Hi, I installed this on Debian and i got this error message when I started the start-lab.sh script:
“: no such file or directory
“: no such file or directory
“: no such file or directory
“: no such file or directory
“: no such file or directory
“: no such file or directory
“: no such file or directory
“: no such file or directory
“: no such file or directory
“: no such file or directory
I done some debugging while i run the script: bash -x start-lab.sh
The script did stop when it called out the expect script at the end. I did some googling and found out that i need to specify where to find the expect “program”. This is at the end of the start-lab.sh script:
for device in `cat /var/linevty-lab/tmp/lab-devices.txt`; do
/usr/bin/expect -f /var/linevty-lab/exp-start-lab.exp $labdir $device
done
Original it looked like this:
for device in `cat /var/linevty-lab/tmp/lab-devices.txt`; do
/var/linevty-lab/exp-start-lab.exp $labdir $device
done
Hi Steve
Just remembered the fix as just had to rebuild after drive failure, but Tom was correct I also had to add “/usr/bin/expect -f” make it work. I also had to create a logs folder in /var/linevty-lab/. It then worked like a dream afterwards, saving me a shed ton of time.
Thanks
Are you using Centos 6.4 out of interest?
Yeah. 6.4
Out of interest, is there a way for it not to disconnect me from the virtual console?
The
PJ
How do you mean?
Hello,
Great Guide !
Can you please post the components of your Esxi server please ?
Best Regards
Hi Gonçalo
Which components are you referring to?
The specification is largely irrelevant as the CSR’s will run with a minimal spec once you enable TRansparent Page Sharing (TPS). But my spec is 2x quad core x5500 series intel cpu’s and you could get away with 32gb ram
Hello !
Thank you for the reply first of all.
Second, do you think I will be able to install an ESXi on a motherboard ASUS-H97-PLUS,
I5-4690, I have 16gb of RAM atm but I can upgrade to 32.
My concern is the NIC might not be compatible with ESXi.
Also are 2 physical NIC’s required or we can get away with one ?
Best Regards,
Gonçalo Rodrigues
Sorry I’m not familiar with that hardware so cant confirm, but I expect an i5 processor to be sufficient for labbing. You could probably get away with 16gb of ram but that’d be very tight, with TPS enabled each VM once running was taking about 700MB memory each, so that’s roughly 14GB required for INE’s biggest 20 router lab, add ESXi requirement of 2GB thats all your memory gone and you still need your linux orchestration server as well.
Hello,
I think I have all files in right places, but I’m getting this error.
Anyone know why?
Please select a lab: 2
LAB 2 slected
Your starting lab 2 which is lab ine/authenticating.bgp.peerings
——————————————————————-
— Configuring r10 on 172.30.1.210:23 for ine/authenticating.bgp.peerings @ Sat Jul 20 10:30:05 EDT 2019
————-
spawn telnet 172.30.1.210 23
Trying 172.30.1.210…
Connected to 172.30.1.210.
Escape character is ‘^]’.
User Access Verification
Username: cisco
Password:
R10#configure replace http://172.30.1.101/base/reset/r10.txt force
Error: Could not open file http://172.30.1.101/base/reset/r10.txt for reading
R10#copy http://172.30.1.101/ine/authenticating.bgp.peerings/r10.txt running-config
Destination filename [running-config]?
Accessing http://172.30.1.101/ine/authenticating.bgp.peerings/r10.txt…
%Error opening http://172.30.1.101/ine/authenticating.bgp.peerings/r10.txt (I/O error)
R10#write mem
Building configuration…
[OK]
R10#exit
Connection closed by foreign host.
————-
— Finished configuring r10 for ine/authenticating.bgp.peerings @ Sat Jul 20 10:30:15 EDT 2019
——————————————————————-
This is an issue with your web server configuration. did you follow all the steps including;
Wow. This is an incredible blogtorial. I was able to follow this to a tee. Yes, I had to do some troubleshooting, but I got it all setup and working. Full automation and all. Thank you sir. If anyone has given up on this setup. DON’T! His instructions are on point.
I was able to get this setup and running without errors. The issue I’m seeing is after the script has completed a task and moved on I’m not actually seeing the changes on the csr’s. None of the content from the configs were applied. Is there something I’m missing.
Please select a lab: 69
LAB 69 slected
Your starting lab 69 which is lab ine/basic.ip.addressing
——————————————————————-
— Configuring r10 on 192.168.1.210:23 for ine/basic.ip.addressing @ Wed Jan 20 15:37:28 PST 2021
————-
spawn telnet 192.168.1.210 23
Trying 192.168.1.210…
Connected to 192.168.1.210.
Escape character is ‘^]’.
R10>cisco
————-
— Finished configuring r10 for ine/basic.ip.addressing @ Wed Jan 20 15:38:36 PST 2021
——————————————————————-
Hi Tony, sorry for the delay. So it looks like expect has connected to your router (as it shows ‘R10>’)
Did you fully apply the base config? as the script should be connecting to the router, and the ‘line vty 0 4’ section should use ‘login local’ – it should be presenting with a username prompt instead of the ‘R10>’ prompt
Tom’s fix to this was:
Hi, I have found out what it was. In the last line of code on start-lab.sh i change it to:
for device in `cat /var/linevty-lab/tmp/lab-devices.txt`; do
/usr/bin/expect -f /var/linevty-lab/exp-start-lab.exp $labdir $device
I personally didn’t have to do this, but posted for reference if it helps